Introduction
I couldn't have done this tutorial without the contributions of KillzXGaming for Switch Toolbox, as well as those who came before me to look into menu/bflan shit like CSK, Supplebones, Kalomaze, and zrksyd. Thank you all for your contributions to this massive effort.
BFLAN files are the UI equivalent of .nuanmb files, in that they contain all (yes, *all*) UI related animations. This tutorial is aimed to help you 1) get a greater understanding of what purpose BFLAN files serve, as well as 2) how you can go about editing them effectively & bypass the annoying aspects of Switch Toolbox. It’s not super involved and despite the size of this tutorial, it isn’t very complicated. You can do it!
Why Toolbox?
Unlike SLE, Toolbox shows textures, can preview animations, and most importantly, has a more user friendly UI for animation editing. You can try editing them in SLE if you'd like, and much of the info in this tutorial will carry over to SLE, but this tutorial is not designed with it in mind (especially concerning animation types, as they are named differently. if you'd like, you can cross reference the name of the anim type in toolbox and its name in a hex editor to find what SLE will name it).
Required Knowledge
- Experience with Toolbox and/or SLE
- This BFLYT editing guide by KillzXGaming, creator of Switch Toolbox (which covers the layout.arc nicely, including animations)
- Some highschool math knowledge
- The Glossary (Shown Below)
Glossary
Categories of BFLAN Animations & Explanations
Tag Info
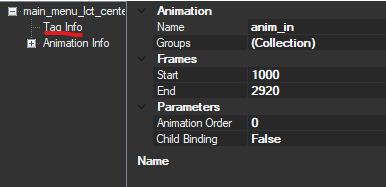
- Name: Name of animation (likely what the game references in the code to figure out what anim is what).
- Groups: Lists the collection of panes an animation has control over
- (Collection): The way the game groups panes together. If you open this, it will tell you the name of the Animation Group it references, but not the BFLYT it’s inside of (though u can usually figure it out by the name of the animation). You’ll have to edit that list in order to add new panes to an Animation Group, especially important when doing custom UI work instead of just making edits
- Frames: The range of frames that the animation can play for (dont worry about where it starts or ends, the most important thing is the # of frames between the min and max you set).
- Animation Order: The order in which the game calls in the animation. Keep this the same or the animation may not play.
- Child Binding: Whether or not the animation effects animations parented to this one, maybe? To be honest I have never seen this turned on and I don’t want to find out what’d happen if I were to turn it to True.
Animation Info
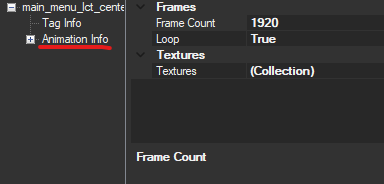
- Frame Count: The range of frames that the animation will play (based on the frame min and max from the previous section. Setting a frame count out of range may result in an error or a cut-off animation.
- Loop: Whether the animation loops or not. Very useful for moving backgrounds/any animation mod really
- Textures: Used for TexturePattern animations, which are basically shitty gifs. You have to type each BFTEX name in, manually. Yes, it does suck ass, but also it's very cool that it's there in the first place.
- (Collection): Lists the texture files (name only, not extension) used in a TexturePattern animation
Animation Group (Part 1)
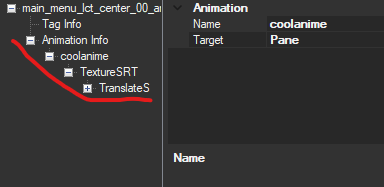
- (Pane Name) (example: coolanime): Any pane on the list of the specified group in the Group (Collection) section
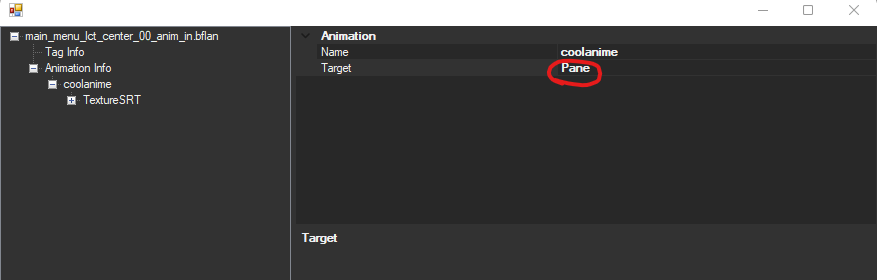
- Target: The kind of animation the game will interpret your animation as: either Pane or Material.
- Pane: Controls Pane animations, which essentially means everything involving the pane that the textures display on in-game.
- Material: Controls Material animations, which controls how the texture itself is displayed on the pane, rather than the other way around
Animation Group (Part 2)
- (Animation Group) Type: The general type of animation. Is a wide category (I.e PaneSRT) as opposed to something specific like the (Animation Group) Target.
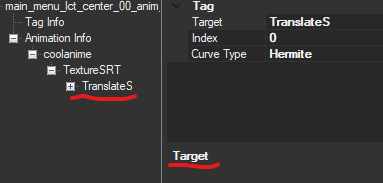
- (Animation Group) Target: The specific type of animation under a certain category. For instance, if you set PaneSRT as the (Animation Group) Type, you must specify whether you want to edit the Scale, Rotation, or Translation for X, Y, or Z for the (Animation Group) Target.
- Index: The ordering of the (Animation Group) Targets in their respective hierarchies (u do not need to edit this)
- Curve Type: I think this may be the way in which the Slope is calculated. tl;dr, use Hermite by default and use Step if you’re making TexturePattern animations. I haven't used Constant before, but the slope is probably closer to a straight line instead of the wavy or step-like slopes for Hermite and Step, respectively.
Pane-Based Animation Types
- Pane SRT: Controls scale, rotation, and translation of a pane.
- Visibility: Controls the visibility of the pane (0 is invisible, 1 is visible).
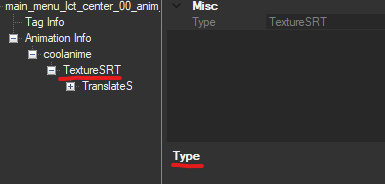
- TextureSRT: Controls scale, rotation, and translation of a texture, within the bounds of a pane. Can only be enabled if you set the Type as Pane, but will only function in-game if you change the Type to Material afterwards. A short guide is below:
When you hover over this with your mouse, you’ll see a small light gray box at the right end. Click it and an option menu will appear with two choices, Pane and Material. Click “Material” and it will function as intended
- VertexColor: Controls the RGBA colors of the pane. Is divided up by each corner and color (yes, individually colored corners. don't ask me why they didnt add a PaneRed/Green/Blue command like they did for PaneAlpha).
Material-Based Animation Types
NOTICE: Toolbox support for Material animations is...lacking. You cannot assign targets for the following [MaterialColor, PerCharacterTransformCurve, AlphaTest], which means you can only edit pre-existing ones unless you hex edit it in (which i will not be covering for this tutorial, as it's easy to break things when trying to add types via hex). However, since you can edit Alphas and Pane colors with their Pane equivalents, the major uses for Material Based Animations are TexturePattern, TextureSRT, and IndTextureSRT.
- MaterialColor: Changes the color of a material (materials are different from panes!). Used for buttons mainly
- TexturePattern: Used to switch the texture used by a material. Allows for the creation of animations to swap textures on the fly, usually used for changing damage colors, player-colors not controlled by params, changing the CSS headers/bg in different modes, among other things. I just used it for amogus
- TextureSRT: Hey, this one looks familiar right? Since it’s technically a Material Animation, I’m putting it here as well.
- IndTextureSRT: This is used to change the UV properties of a material ((rotation, U (horizontal) and V (vertical) length)). I have not gotten this to work in-game, and all its assumed functions are possible via TextureSRT.
- AlphaTest: idk
- FontShadow: Probably controls the color and alpha(?) of font shadows. May only be useful for text panes, not sure.
- PerCharacterTransformCurve: I can only assume that this is for skewing specific characters of text, or something otherwise related. idk for sure
- FLFS: Cannot be added via toolbox; may have something to do with switching shadows and outlines on/off like the buttons on the Main Menu.
"Mayamia, there's something here called [SEQUENCE OF FOUR CAPITAL LETTERS STARTING WITH F (it's probably not FUCK but it's a possibility)]! What does this mean?"
It means that Toolbox doesn't recognize it and thus reads it directly out the hex as it's displayed there. I've seen one that's text related, which may control the text lighting up or something. need further testing. And as previously mentioned, you'll have to actually add that yourself via hex (which i am not going to explain here).
Common Toolbox Issues & Fixes:
- My texture is lower quality than it should be!
- Reimport it.
- My game crashed after I deleted a pane, material, texture, or any other file present in the vanilla game!
- Solution: Put the vanilla one back in. You may have to go into switch layout editor, fix the material # for the pane, and then it may work. But oftentimes the layout.arc is incredibly fickle, and for this reason i recommend blanking things that you don't need out by changing the pane's alpha to 0, replacing the texture with a 1x1 black square, setting visibility to 0, etc, and for removing animations, just removing everything under the Animation Type.
- Toolbox stopped showing me the textures right and some stuff looks all funky now
- Close and reopen toolbox after saving your progress, or find the nearest Part pane, type any character under the “Part” tab, and then delete it. May not work when viewing TexturePattern textures.
- Toolbox is giving me a weird error and a big red X is over the BFLYT preview!
- This could be a number of things, but the common ways to fix this is by
- Opening it in SLE and making sure to fix the material index number (it'll bug out and change it to 65535 or something when u delete shit u arent supposed to)
- Put the layout.arc in a different folder, delete the OG one, and open it from there. I know, it's really fucking weird, but it be like that sometimes (and u can put it back when u wanna use it, it’ll work in-game).
- I exported and renamed a BFTEX texture, but when I imported it, the name didn’t change in the tool
- You have to manually change the name of each BFTEX texture inside Toolbox or another program. BFTEX files are named internally, so the filename doesn’t change as easily as changing the file name in windows once its been formatted to BFTEX.
.
Basic Editing Tips:
- The Z scale, outside of rotation, is very finicky and does not control the "layer" a pane is on. I.E, you can't edit the Z position to make something load on top of something else. For panes within the same layout.arc, it is dependant on its position in a BFLYT's hierarchy (the lower the pane on the hierarchy, the closer it'll be to the front of the screen. And as CSK figured out, the order in which entire layout.arc files are layered is dependant on the load order set by the game's code (which i will not cover in this tutorial).
- Keep in mind that when you set any SRT data, it will "overwrite" the original settings of the pane while that animation plays, rather than "add" onto them. For example, if a pane's position is at X: 34 and Y: 20, and the animation (let's say translateX and translateY) starts at frame 0, and sets the X as 35 and the Y as 400, as long as the animation plays it will change the starting position to X: 35 and Y: 400, not X: 69 and Y: 420 (unfortunately). I doubt anyone else would think this way, but I fell victim to that idea during menu animations and things stopped making sense very quickly lmao
- You make animations via keyframes and interpolation. for people who aren’t nerds, that means the game will do its darndest to get your Pane or Material from Point A to Point B by itself. Your job is to map the key (hey) points along its journey.
- If you're ever used animations in VEGAS or other programs which utilize this kind of keyframe-based animation, it will be second nature to you. Otherwise, editing BFLAN files may help you better understand how those kinds of programs work. Win-win!
- Rotations use degrees. If you go above 360 then it will adapt accordingly. (i.e if you set RotateZ to 720, it will perform two rotations.
- All RGBA colors have a max value of 255.
- Positions (somethingXYZ) have no max/min value afaik. You can set TransX to 10000000 and ScaleX to like 100 and it may stutter terribly but it should still load in.
- Scale =/= Size. Scale is like a size multiplier, while size is the base set of dimensions of the pane.
- Slope fucking sucks. My best advice is to find a reference for what you want within the game itself, or off of another mod. I usually set it to zero, but there are times where it may be necessary. Lots of referencing is necessary to get things right, though hopefully this tutorial will help.
Advanced Editing Tips
- The best way i can explain slope is the rate at which an animation is played. If you remember any highschool math, it'll come in handy here. Think of a coordinate plane, and think of the rate as a line formula like y=mx or y=sin(x). If you think of the slope on an coordinate plane, the Y axis would represent the proximity of the animation to the point, color, size, etc that you want it to reach, and the X axis is the period of time between two keyframes. I apologize if that sounds complicated, but it kind of isn’t. Just consider this: the closer the slope is to 0, the more steady the animation will be. For almost every custom animation you’ll wind up doing, you can probably just set it to zero, close to zero, or keep the original slope in from the vanilla game. You can visualize slopes here if it helps you.
- There are 3 types of slopes in the game, which go as follows:
- Hermite, looks like y=sin(x)
- This type of slope is wavy, and thus causes a type of speed up, slow down, wave-like rate of speed. This is the most commonly used animation type in the game, and probably what you’ll be using too. I’m sure it’s for technical reasons/accounting for frame drops or whatever. maybe not. hell if I know lmao
- If you maintain the same slope throughout all keyframes, it will generally be consistent. But the farther you get from zero slope, the faster the rate will be. As the game tries adjusting the animation to the the slope & however many frames are left in the animation, it can cause some inconsistency in speed (or, it can cause what i call an "overshoot," where an SRT animation will make the texture/pane go way farther than they're supposed to for a moment. If you're constantly getting these "overshoots," then i would suggest using a smaller slope value (zero or close to zero is generally fine). I tend to use a zero slope because there's less bullshit to deal with, but for certain animations (such as a looping fullscreen bg) it may not be as feasible if you want it to look smooth. For those mods, I use a slope of -0.000625 for both keyframes. And yes, you heard that right; when i say getting VERY close to zero is usually recommended, I wasn't joking around lmao. Negative slopes will interpolate the frames in reverse, which means in TextureSRT terms that things will scroll in the opposite direction.
- Constant, probably looks like y=mx
- This type of slope is likely a straight ass line. I haven’t seen this much in-game, but I’m sure it has its uses somewhere. It may be good for constantly-moving/looped animations, but I haven’t seen it used for such so I’m not sure.
- Step, Slope doesn’t change until the next value, as though the slope was only present for each individual frame. (explanation credit goes to Zrksyd, who likened it to G&W’s animations)
- Used exclusively for swapping textures in and out, like for the equivalent of a Smash Bros “gif.” This is scene most in Hero’s menu (the spinning cursor), as well as the fire behind the 1st place icon on the results screen. How does it look for other animations? probably makes them choppier looking. idk.
- Adding New Animation Files (BFLANs)
- If CSK or Ray or somebody would like to contribute in the future they can put it here ^^
The Actual Tutorial Starts Here
This is covered in KillzXGaming’s BFLYT Tutorial, but for completeness I’ll post my own shortened version here. To begin editing a BFLAN file, you’ll need to first find the layout.arc that you want to edit. Those are the files that control/contain Smash Ultimate’s GUI, including almost every menu, battle HUDs, the title screen, etc.
In your dump, location the ui/layout folder. There are several subfolders for this, and I’ll try to label some of them here. All sub-sections of a folder will list some commonly edited/interesting ones of my choosing, but not all of them. Treat this as a preview.
- Info: any layout.arc files that appear when fighters are on the screen, basically.
- info_result_window: Results Screen rank & box positions
- info_melee: HUD layout & textures u see during fights
- info_pause: pause screen (Toolbox breaks this screen but u can edit it in SLE
- info_movie_screen: the screen that all ingame movies are projected on (yes even the opening movie), idk why you would care about this but hey maybe you want to make a cute border for the intro or something idk)
- info_aurora_pokesta/info_aurora_punchout: the files containing the layouts for the screen UI on each of these stages
- Menu/Patch: all menu layouts
- main_menu: the main menu & its submenus
- title: the title
- stage_select (in patch): the stage select
- chara_select: the character select icons and background, etc
- chara_select_base: the player cards, back button, player cursors, etc etc
- pallet_menu: the ZR menu on the main menu
- System: UI that’s game-wide and used for various purposes
- loading: loading screen/loading icon
- matchup: the matchup screen that plays before a match starts
- controller entry: may or may not be the screen that shows when someone disconnects midmatch in local battles, and it asks u to reconnect their controller
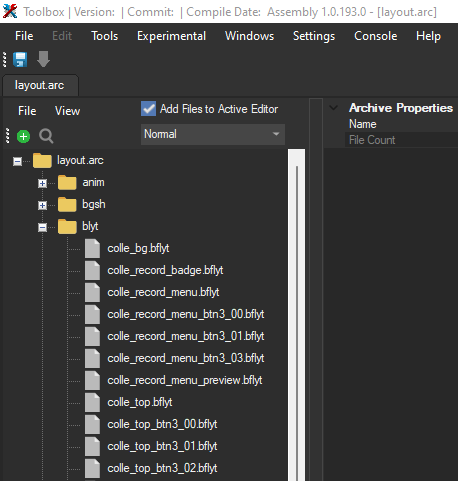
Once you find what you’re looking for, extract the file from ArcExplorer and drag it into Toolbox. You’ll see a few folders, but all we need are the “anim,” “timg,” and “blyt” ones. In the blyt folder, there will be several BFLYT files in a seemingly random order. If your file has a bunch of BFLYT files, i would suggest using the “View” tab to sort them alphabetically, and if you know what you’re looking for already, use the “Search” feature to find it. The easiest way to find what you’re looking for, especially for big files, will be outlined here:
“Where’s That At?” (How to find that thing you wanna animate)
Using the main_menu’s layout.arc, I’ll walk you step by step in finding something specific that we can animate: the “Training Mode” button. So, walk with me here.
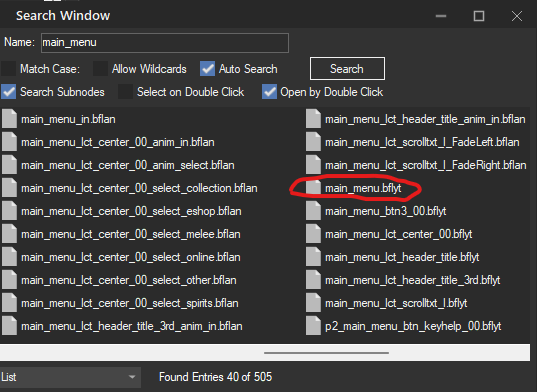
Step 1: Locate the “main” BFLYT file in the layout.arc
- Once you’ve opened the file via drag and drop, press the View buttons and select “Sort.” Looks a lot more organized, huh?
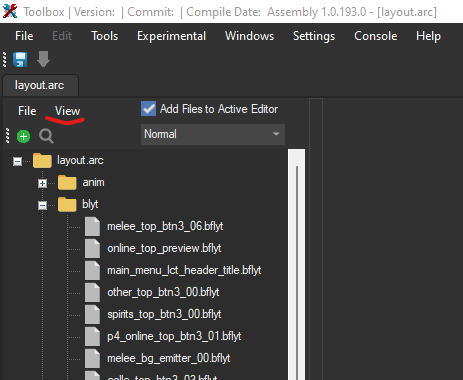
- Next, look for a file bearing the same or similar name to the title of the folder you took the layout.arc from. It’ll likely be named the same thing, so you can try using the search function (it’s the little magnifying glass icon).
- Makes it a lot easier in big files, huh? Make sure to check the “Open by Double Click” box and uh, double click the file.
Step 2: Finding the Right Part (Pane)
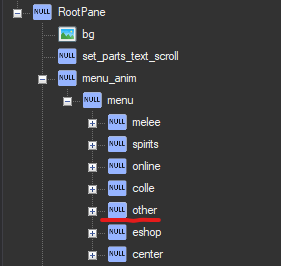
- You should be greeted by a new window containing a bflyt previewer & editor. I HIGHLY suggest that you read through KillzXGaming’s guide at this point if you haven’t already. Click on the + icon next to “RootPane” and you’ll be able to explore the file structure of the BFLYT. Since we’re looking for the menu button for Training Mode, let’s open up “menu_anim.” sounds more relevant than “preview,” right?
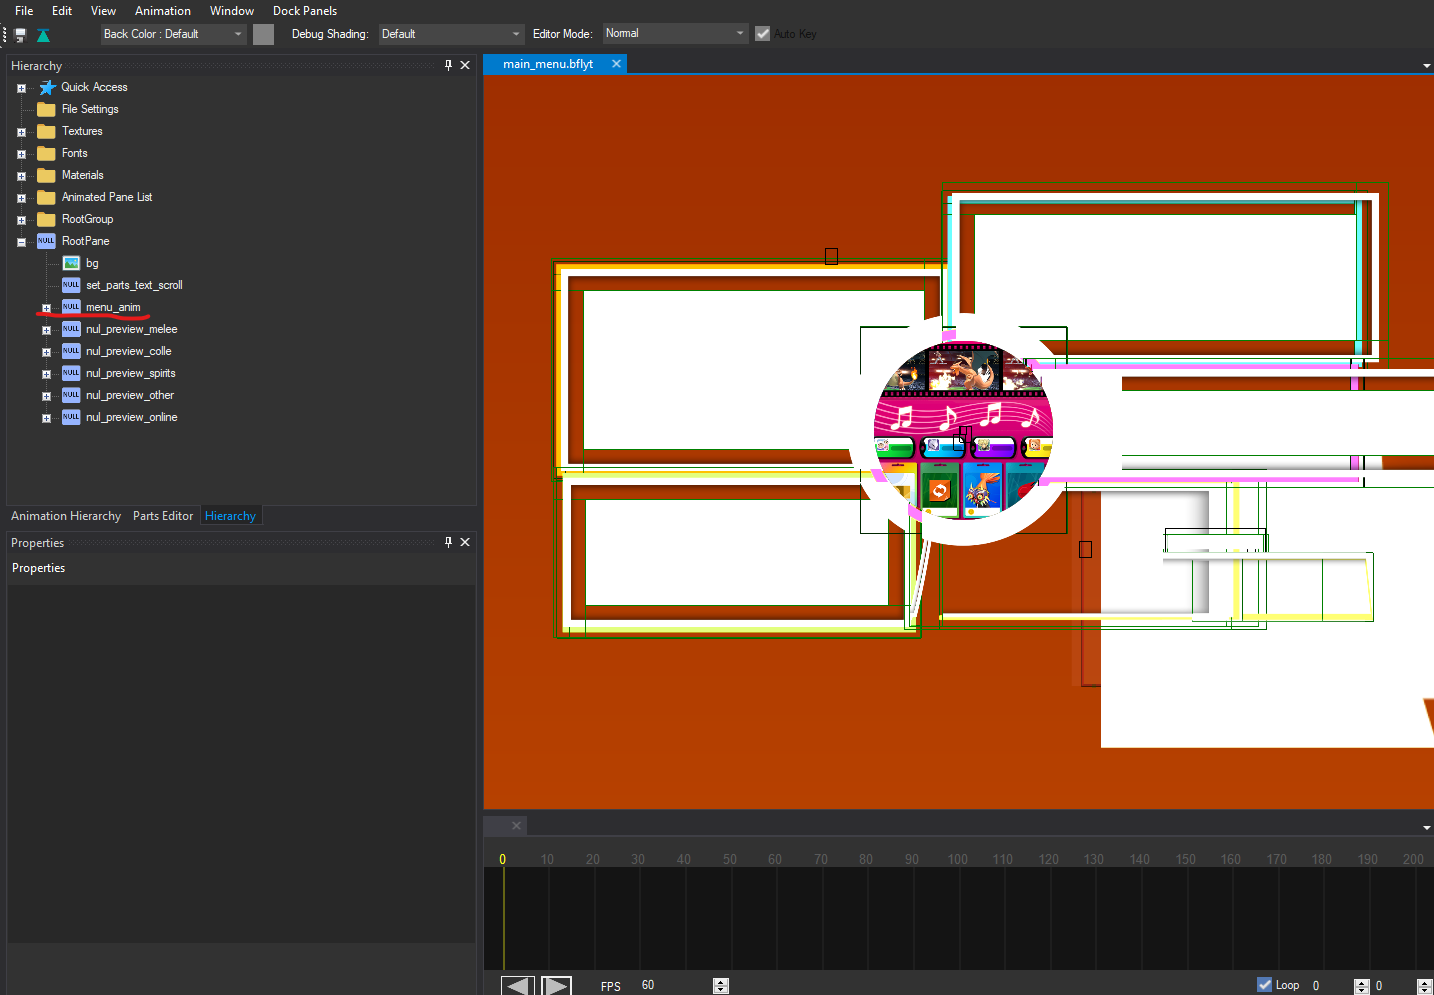
- Next, youll be greeted by some more panes. It looks like it’s divided up by each mode, so we’ll have to snoop around and use some intuition to figure out which is which. Or, if you’re familiar with the main menu, and its submenus, you should know that the “Games & More” section is called “Other” in the game’s files.
- Now, the way that this game stores the submenus is kind of odd. The game shrinks them down to a very tiny size, deactivates the buttons, and thus creates the illusion of it being on a totally different screen. But in reality, every submenu is present on the main menu at once. But wait, some of you may object. Don’t the submenus have separate animations and BFLYT files than the main_menu.bflyt? Yes! the game uses “Part” Panes to call separate BFLYT files into the main scene, which is what we’re going to use to deduce the location of the “Training” mode button.
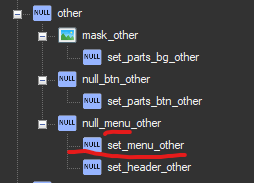
- When you click (once) on set_menu_other, you’ll get a little window on the bottom left that allows you to see the Pane’s properties. It’s pretty barren for Part Panes, but there’s something important there: the “Part” tab tells us the name of the BFLYT file it calls in: other_top!
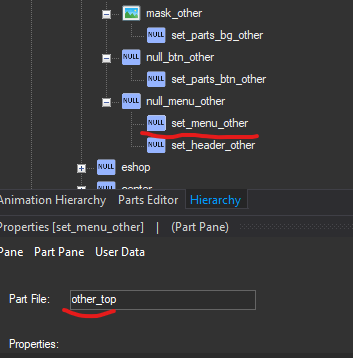
Step 3: Searching for the Source
- And boom, simple as that: we found it :D so now go ahead and open it.
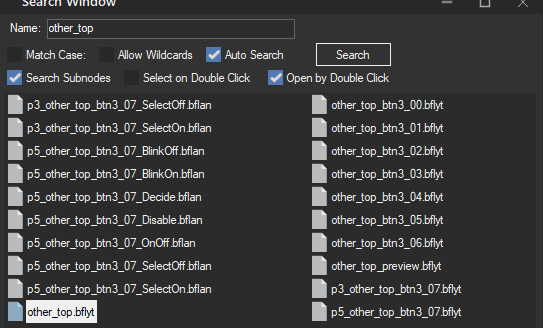
- Again, you’ll be greeted by a preview window and a bunch of panes. Using the real main menu as a reference, you should recognize that dumbbell icon. click through the panes until you find one that makes a rectangle around the dumbbell button, and then you’ll know what BFLYT to hit up next.
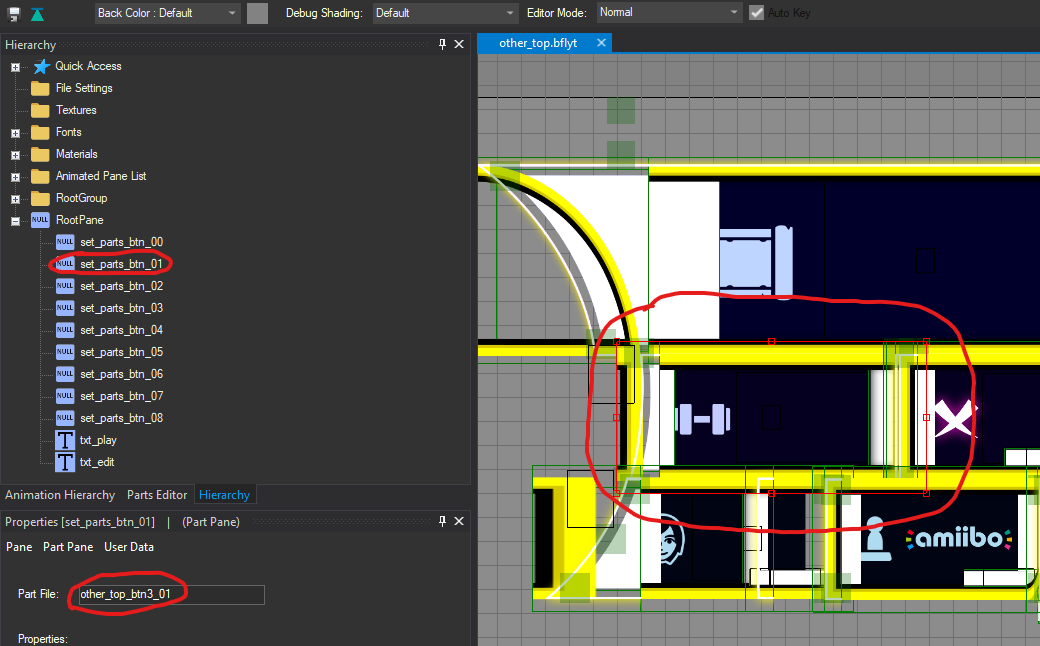
- Now, head to that other_top_btn3_01.bflyt, and you’ll see that we’ve finally found the button we were looking for! You’ll know when to stop when you can find the actual assets for the subject of your animation, rather than a single pane that’s named after it. You see that dumbbell texture at the bottom? You can only find that here in the original BFLYT, so you know this is the BFLYT that’s gonna have the animations for this button specifically.

- Keep in mind that not all (but most) layout.arc files are built or structured in this very linear way, but this is a general guide which can help lead you in the right direction, especially for big buttons. Also, as i’ve come to find out, you can use these part panes to load in whatever BFLYT file you want (so long as it doesn’t create a paradox of infinitely loading assets, then the game will crash).
Okay, Seriously, This is the Actual Tutorial Now
Adding Panes to an Animation
- If you intend to make any new animations using either a new pane or a pane that isn’t in the animation’s Animation Group, you’ll need to add it first. But don’t worry, it’s a very simple process.
- First, open up the BFLYT that your animation influences by (if the animation’s prefix is the same as the BFLYT name, you should be good. i.e “main_menu_in” influences the “main_menu.bflyt,” and “other_top_btn3_01_BlinkOn.bflan” influences “other_top_btn3_01.bflyt”)
- Open the animation, left click “Tag Info,” and open the (Collection) part on the right hand side. You’ll be shown some text which tells you the Animation Group that the animation uses, as shown here:
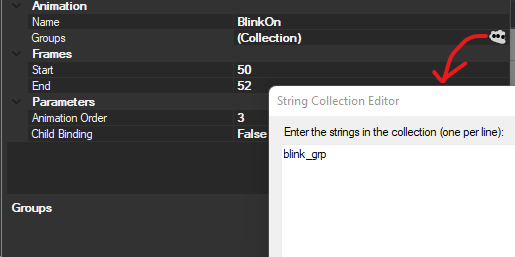
- “blink_grp” is the name of the Animation Group, which you’ll see in this section of the BFLYT editor
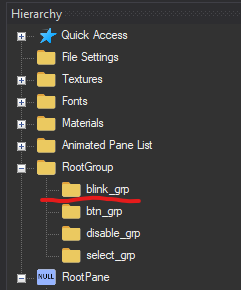

- Open the (Collection) and you’ll see a list of panes inside the file. Now add what you need, if you need to, and you’re set! now you can start cooking :3
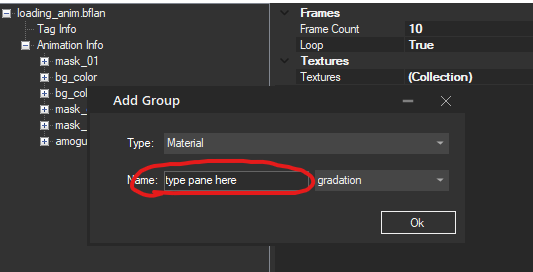
- To add a Pane to an animation, click “Animation Info” and press “Ctrl-A” to create a pane. I know it sounds weird, but for Material animations you have to manually type in the Pane you want to use instead of just clicking it off the list. Like so:
Pane Position Animation (Relevant Anim Type: PaneSRT)
- By far the simplest part of BFLAN editing is changing the position of panes. The pictures below will provide an example of this.
- For this example, I will demonstrate how to use PaneSRT to make the Training Mode button’s dumbbell rotate upon selection.
- First, find the relevant bflyt (which we found out was “other_top_btn3_01”) and the animation we want to edit. I’ll use this one, since the animation player in Toolbox shows the icon glowing up when i click this animation and press the play button at the bottom.
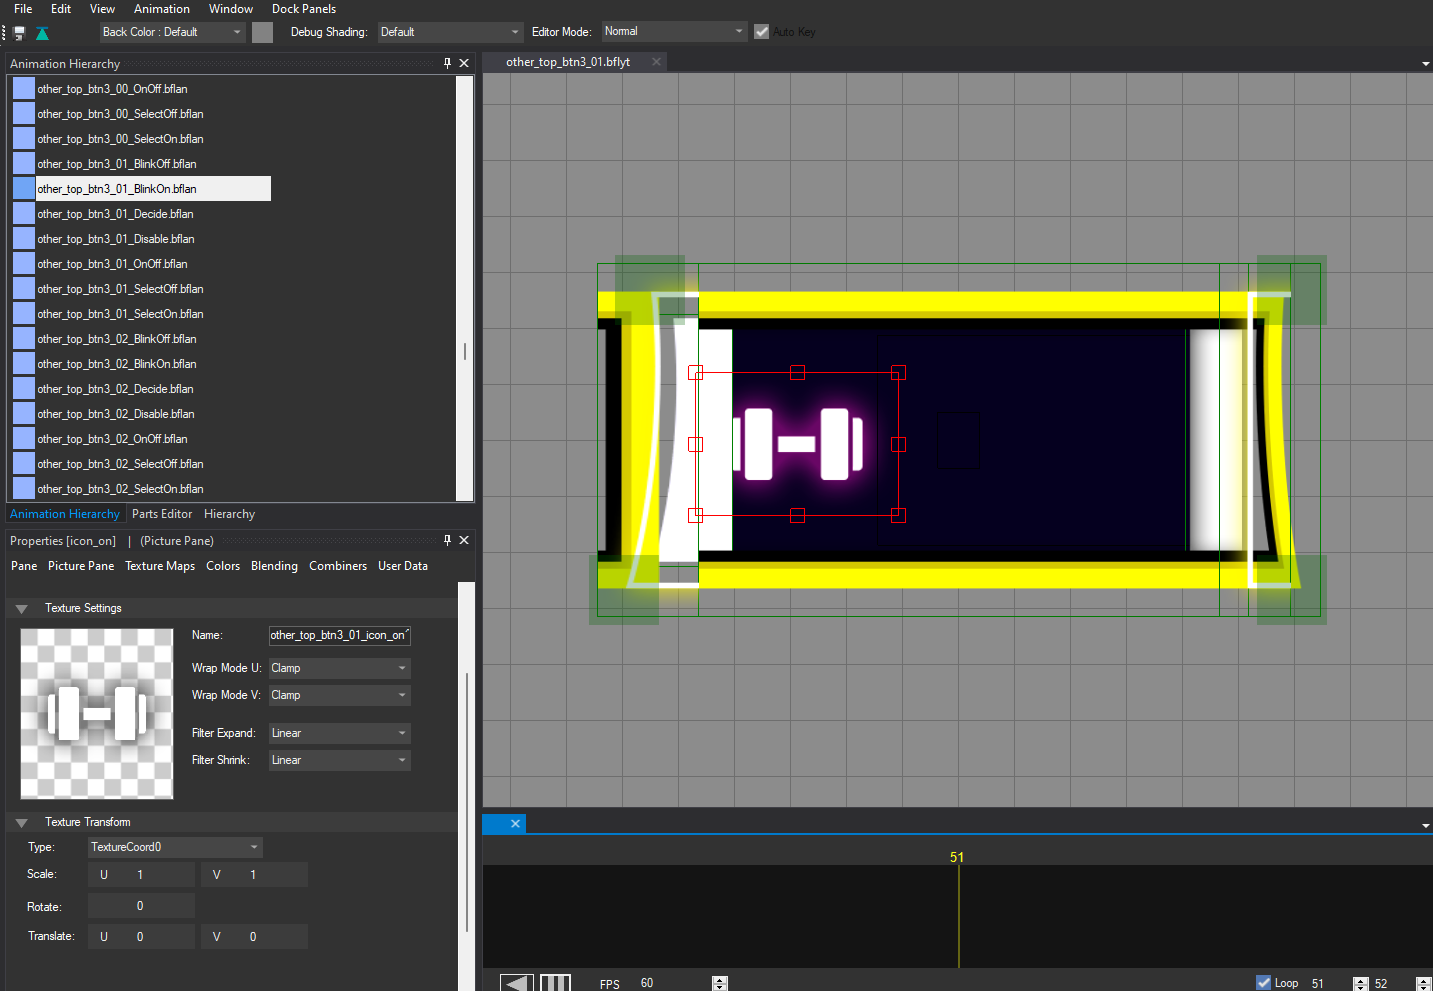
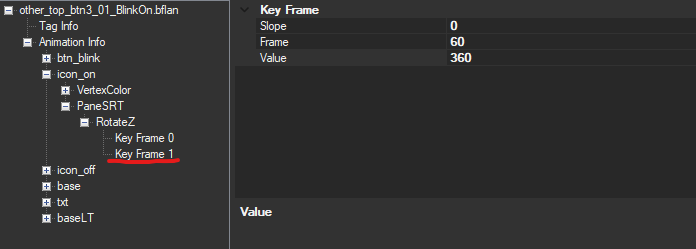
- Next, we double click this .bflan to get the actual animation to open. This window will pop up, and we can go ahead to the relevant [Pane Name]s: icon_on and icon_off. But first, we should note the frame count, which is 2. That isn’t enough for a whole spinny animation, is it? I don’t think so. So let’s first change that to 60.
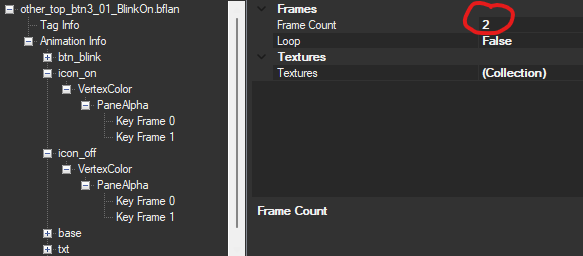
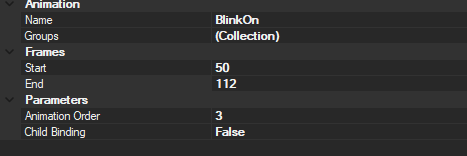
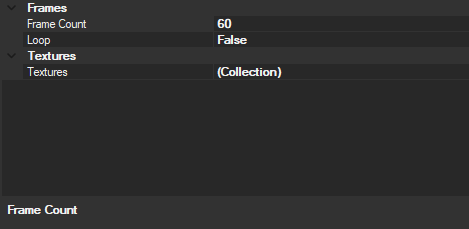
- If you read through the bibliography, you’ll know that the first step is to edit the “End” count. So click on Tag Info, change the End count to something bigger (i’m choosing 112 to get that clean 60 frame count) and then edit the Frame Count value in Animation Info to match what you’ve got set in Tag Info (so I would put 60 here, as shown).
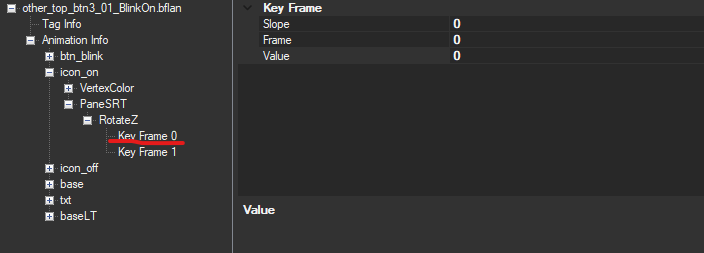
- Cool! So now we have some room. To tell the game you want the icon to spin, you should first set two frames: one frame at 0 to set as the start point, and one frame at 60 to set the end point. You don’t always need to create a starting position, but i like to do it so the animation can reset properly. Here’s what the animation looks like (frame data wise) after i put it in the game:
- And here’s what it looks like in action, inside the game itself:

- So boom! Now you know how to do a basic PositionSRT edit :D
Texture Position Animation (Relevant Anim Type: TextureSRT, TexturePattern)
- This is one of my favorite utilities of BFLAN animations. You can use this to do things like make looping backgrounds, have textures swap in real time based on the animation, make gifs and other fun shit.
- I’ll be using the Amogus Twerk Loading Icon mod for this example.
- The first thing you must do is get the frames. There are several online programs you can use for this, but if you’re using a GIF i recommend dragging and dropping into photoshop, then hit File > Export > Export Layers To Files (PNG or JPEG works, it’s up to you). I would highly recommend against using a gif or video with lots and lots of frames, because you have to format each image/insert each frame individually. Keep in mind that Photoshop may export the frames in reverse, which is hella annoying but won’t be an issue in the long run, as long as you remember that the numbers are in reverse.
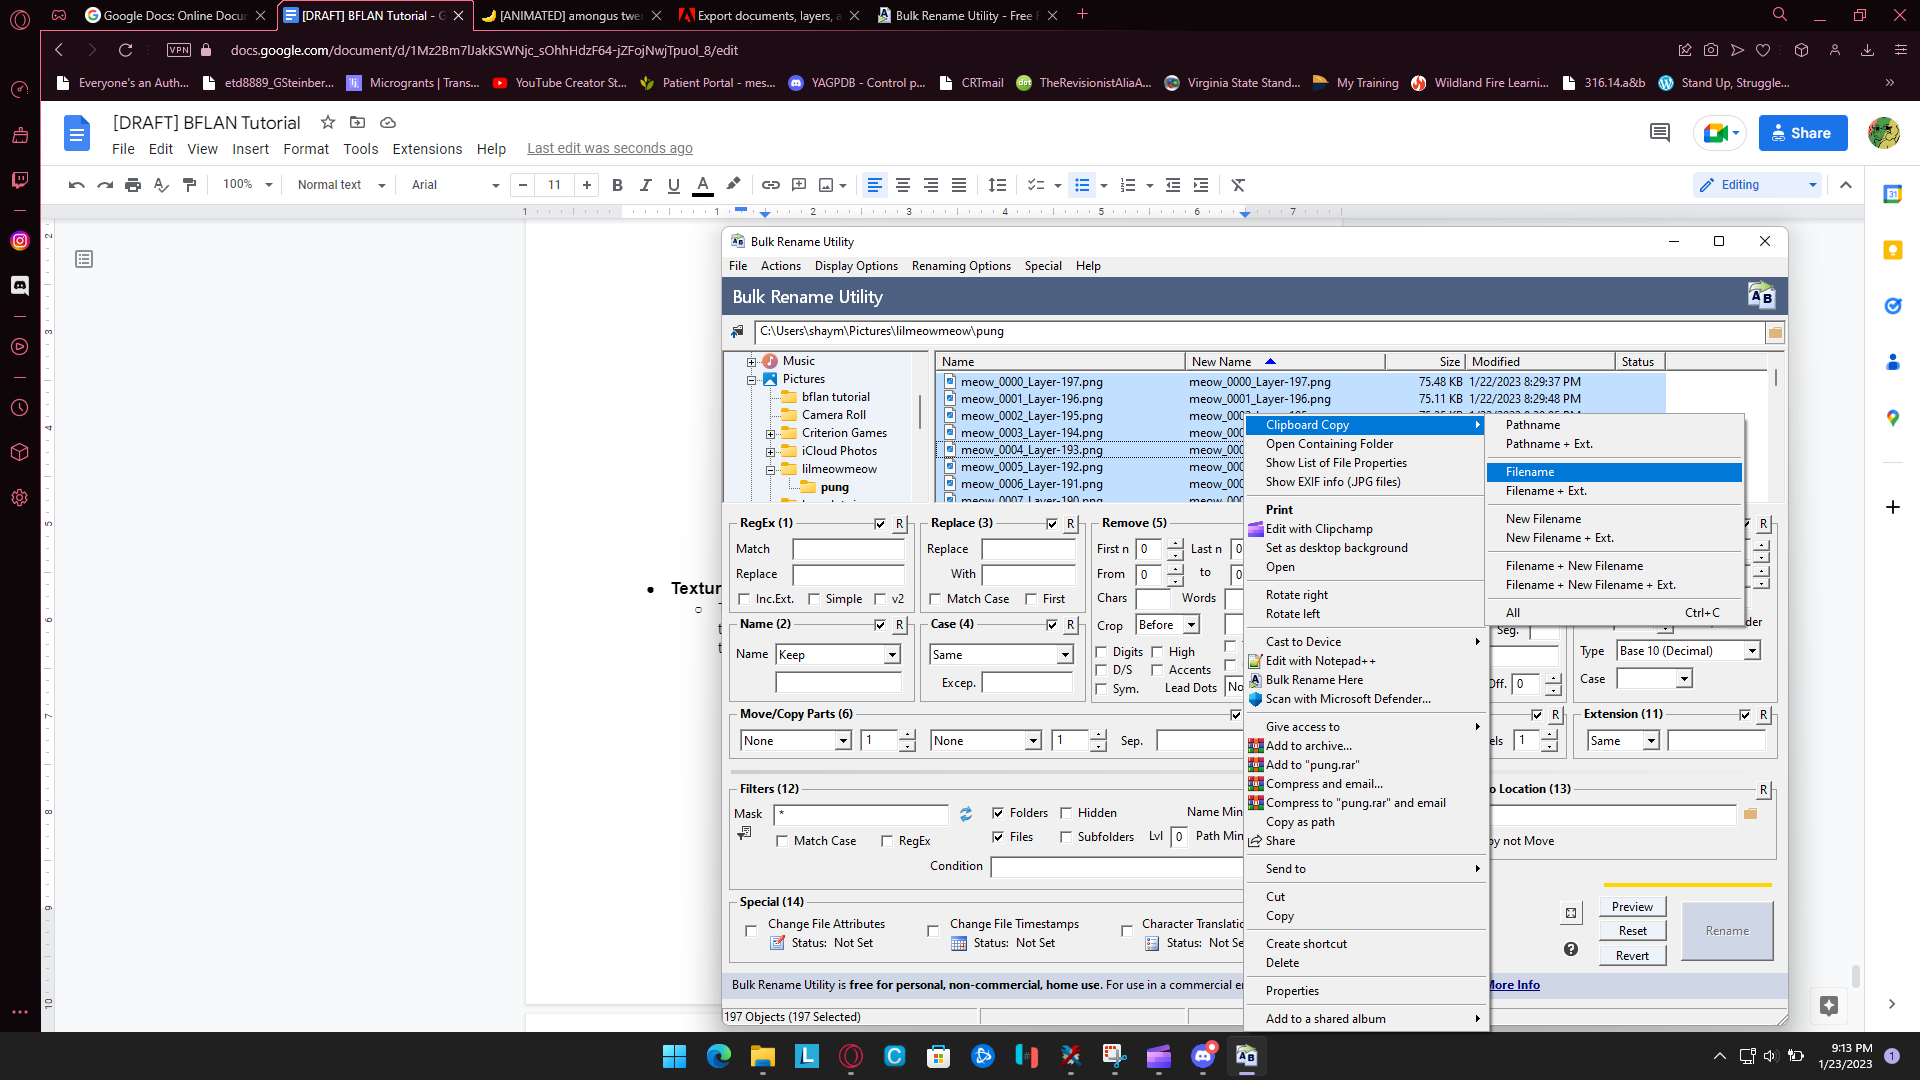
- Once you have all the individual frames, you’ll need to grab all their names. You’ll be putting them into a list later, so you may as well grab them now. There are a few ways I’m sure you could do this, but I use Bulk Rename Utility. You can open up the folder containing all the images, select them all, then right click through this context menu & hit “Filename,” so basically do this:
- Now paste this list somewhere and don’t lose it, you’ll need it later on.
- Now, open up the layout.arc you want to add a gif to. For the amogus twerking icon, I used the layout.arc in ui>layout>system>loading>loading.
- Speaking of which, here’s the fun part: importing the textures into toolbox :D
- Open up the timg folder I mentioned waaaaay earlier, double click “Combined.bntx,” and then right click > Import Textures. You’ll want to navigate to the folder you stored your textures in from earlier, and then select all of them. Toolbox may take a second to load them in, but it’s okay with mass import.
- MAKE SURE YOU SAVE EVERY TEXTURE WITH 1 MIP, 0 SWIZZLE!! I don’t think format matters too much but for the sake of size I’d stick to BC1_UNORM
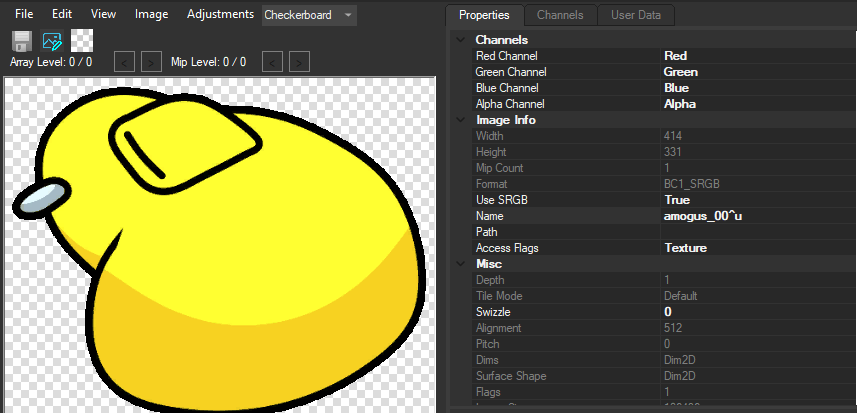
- As you can see, (no, keep your eyes on the right!) Mip Count is 1 and Swizzle is set to 0 during the import process. You’ll have to set this up for every texture you use, as they’re set to 9 mips by default.
- You don’t have to do this, but in order to avoid potential conflicts with other animations, I created a new Picture Pane instead of using an existing one, changed the size to something larger than the 30x40 they assign it by default, and dragged it onto the loading_pos Null Pane. Drag and dropping panes on top of a different one will put the dragged & dropped pane to the bottom of the “hierarchy,” which makes that pane display over any pane above it. Panes! Lots of them. Sorry if that was confusing, tl;dr drag and drop saves lives.
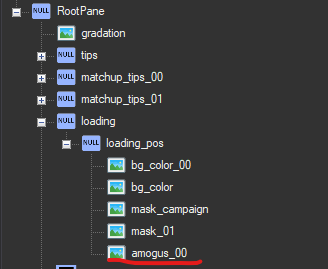
- Meet amogus_00, which i named for the sake of organization. I’m not 100% sure, but I don’t think you actually need to follow any specific naming conventions so long as you name everything properly when it comes to the animation part. You’ll want to assign one of the frames of your gif mod to this, as it’ll be what displays when the animation first starts, which you can do by editing in the name in the Texture Maps section.
- Toolbox is janky, so sometimes it won't actually show your imported textures. To fix this, type in the name of the placeholder frame you’d like to use and then hit “Ok.” It may show up as a purple checkered texture at first, but if you typed the name in properly it’ll fix itself after you reload the BFLYT.
- Now, reference the “Adding Panes to Animation” section to add your Pane to the animation you’d like to use, and then open that animation up so we can wrap this up.
- Also, make sure to set the”Start/End” and Frame Count to match the # of frames you imported, or if you want it to be a bit slower, you may want to set around double the # of frames you actually imported and just set each frame apart by two frames rather than one.
- Then, open up the list of names you ported and copy-paste that into the window that comes up with Textures -> Collections, and then paste it
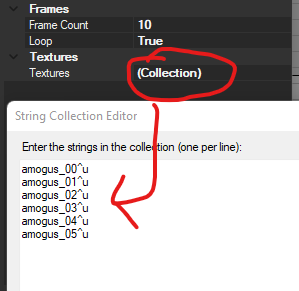
- Keep in mind that the order here is the order in which the game calls them, starting from 0 to whatever. So if you assign 5 as the first frame’s value, it will load the 6th item on this list. It’s not based on name, thank god, but just be mindful that the list order is very important.
- Assuming you’ve already added your pane to the list, add the Target and Type. it should look something like this (excluding the keyframes):
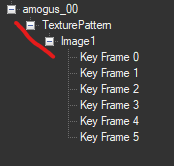
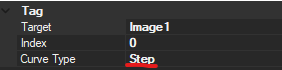
- Ensure that you’re using TexturePattern and Image1 only, as the others don’t seem to work properly for this. Now, and this is key, make sure that Image1’s curve type is Step. Otherwise, this will not work.
- Now, add the keyframes by selecting Image1 and using Ctrl-A. You should be able to keep slope at 0, and set each “value” to the corresponding position of its frame on the list you copy-pasted. Here’s an example of what a keyframe’s data may look like, taken from the 2nd keyframe of the amogus mod:

- Once again, the Frame represents what frame it’ll play on (so if you set Start to 50 and End to 112, and then set the Frame Count to 60, frame 2 would essentially be frame 52 out of that 112) and the Value represents the placement of the frame’s name on that list you put in (Collections).
- Once you’re done, you should be able to save (PLEASE SAVE), exit out of toolbox, load everything back in, and then preview it in the tool.
- If it works, then it should also work in game.
- Like I said above, colors are just 0-255 values that are calculated for each corner of a pane. If you’re familiar with Inkling ink color UI mods, then you should already be somewhat familiar with this. If you’re curious about that or other types of RGBA Animation editing, you can check out this Changing Inkling Ink Color tutorial which goes into it more than I’m willing to right now.
End
And that’s a wrap! Congrats!! I hope this tutorial has helped you in some way. Have a good one ^^